![]()
Getting Started
![]()
Getting Started
更新 2020/11/01
どうも、こんにちは!JellyWareです。
Getting Started!! Riiiver tutorialの第17弾となります。
このシリーズは、Riiiverやプログラミングを学び、初心者の方でもEco-Drive Riiiverを活用したオリジナルアプリを理解して作れるようになることを目指します。
今回は、四字熟語の「晴耕雨読※」に挑戦したいと思います。実際に田園地帯に行って悠々自適な生活をすることは難しいですが、その手助けとなるようなものを作りたいと思います。
※晴れた日には田畑を耕し、雨の日には家に引きこもって読書するように、世間の煩わしさから離れて穏やかに暮らすこと
以下が完成品のイメージです。


Eco-Drive Riiiver をアレンジして、明日の天気情報を取得してスマホにテキストを通知させます。「晴れの日にすること」「雨の日にすること」を設定して、自分なりの晴耕雨読を楽しみましょう!
今回のPieceは、新しい要素が出てきますので解説します。
位置情報を利用して天気情報を取得します。アプリ側で緯度/経度や地名を入力したり、地図で場所を指定して取得することもできますが、今回はスマートフォンの位置情報を利用します。
位置情報を利用する許可をユーザーから得るため、"permissionList"を追加します。また利用する位置情報の精度を決めるため、"serviceProxy"内に"parameters"を追加します。
"serviceProxy":{
  "service":"pieceSample",
  "parameters":["location_accurate"]
},
"permissionList":{
  "ios":["location"],
  "android":["location"]
}"parameters"には、"location_rough" < "location_normal" < "location_accurate" の3種類を指定でき、順に精度が上がっていきます。ただし、より良い精度の位置情報を使用すると、位置情報の取得時間が長くなります。詳しくはドキュメントをご参照ください。
また、Piece Func側では以下のようにして位置情報を受け取れます。
 const lat = event["properties"]["parameters"]["location"]["latitude"];
 const lon = event["properties"]["parameters"]["location"]["longitude"];
天気情報の取得には、OpenWeatherを使用します。まずは、第8弾を参照してAPI Keyを取得してください。
今回は、One Call APIを使用します。以前に使用したCurrent Weather Dataとは異なり、翌日などの天気情報も取得できます。
基本となるURLはhttps://api.openweathermap.org/data/2.5/onecallです。こちらにさまざまなURLクエリパラメータを付与することができます。
今回使用しているパラメータは以下です。その他のパラメータや詳細は、公式のドキュメントを参照ください。
| パラメータ名 | 解説 | 今回の値 |
|---|---|---|
| units | 温度の単位を指定できます。今回は℃にしてます。 | metric |
| lang | 言語を指定できます。今回は日本語にしています。 | ja |
| exclude | 不要な情報を省けます。今回は現在,分単位,時間単位の情報を省いています。 | current,minutely,hourly |
| lat | 緯度を指定します。 | スマホの位置情報 |
| lon | 経度を指定します。 | スマホの位置情報 |
| appid | API Keyを指定します。 | アプリで入力された情報 |
今回は最終的に以下のようなURLを使用します。
https://api.openweathermap.org/data/2.5/onecall?units=metric&lang=ja&exclude=current,minutely,hourly&lat=35.658584&lon=139.7454316&appid=xxxxxxxxx
天気に応じて動作を切り替えるために、ifを使います。いわゆる「条件分岐」と呼ばれるものです。具体的な書き方は以下の通りです。
if (条件) {
    // 条件を満たす場合に実行される
}
try…catch文のように{}で囲んだ範囲が実行されます。ただし、()内に記載した条件を満たしている場合のみです。
「条件」は、基本的に「比較演算子」と呼ばれるものを活用して表します。数値の大小比較など簡単にチェックできるので便利です。例えば、今回使用している比較演算子==は、左辺と右辺が等しいかどうかをチェックします。
if文とは以下のように組み合わせて使用します。
const weather = "晴れ";

if (weather == "晴れ") {
    console.log("今日は晴れです");
}

if (weather == "雨") {
    console.log("今日は雨です");
}2つのif文では、それぞれ変数weatherが"晴れ"、"雨"と等しいかをチェックしています。結果として、weatherは晴れなので、1つ目のif文のみ実行されています。(weatherを"雨"にすると、2つ目のif文のみが実行されます)
また、if…else文を使うと複数のif文をまとめることができます。例えば、上記のコードは以下のようにまとめられます。
const weather = "晴れ";

if (weather == "晴れ") {
    console.log("今日は晴れです");
} else if (weather == "雨") {
    console.log("今日は雨です");
}
ifをelse ifに変更することで、1つにまとめられます。また、elseのみにすると、どの条件にも満たされない場合に実行されます。
const weather = "晴れ"

if (weather == "晴れ") {
    console.log("今日は晴れです");
} else if (weather == "雨") {
    console.log("今日は雨です");
} else {
    console.log("晴れでも雨でもないです")
}
これで基礎編は終了です。それでは作成するiiideaについて解説していきたいと思います。まずは Trigger, Service, Action Piece を解説します。
既存の「デイリータイマー」を使用します。
指定した時間に毎日自動でiiideaを実行できます。

今回新しく作成します。
OpenWeatherと条件分岐を活用して、晴れの日と雨の日に応じて次のPieceに渡す文字列を決定します。
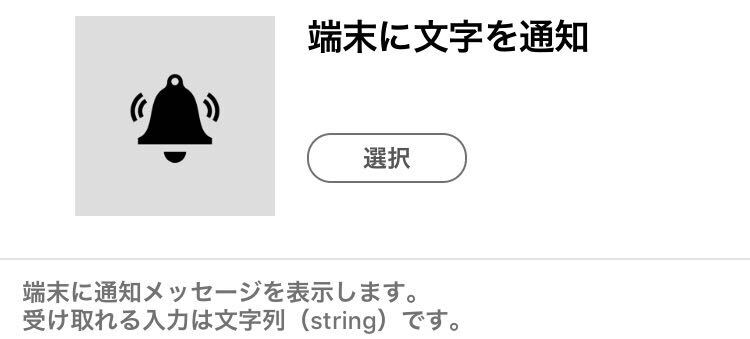
既存の「端末に文字を通知」を使用します。
Eco-Drive Riiiverと連携している端末に通知が届きます。
次に、Piece JSONについて解説します。
{
    "title": {
    "en": "Sunny or Rainy?",
    "ja": "晴耕雨読"
  },
  "version": "1.0.0",
  "sdkVersion": "1.0.0",
  "deviceId": "none",
  "vendorId": "none",
  "description": {
    "en": "Find out if tomorrow will be sunny or rainy, and send this information to the next Piece.  You choose what text to send on depending on whether the result is: Sunny, Rainy, or Other.  For instance, for a sunny forecast, send the message: 'Pack your beach towel!'  Please note that if you don't enter personalized text, this Piece will output default text in Japanese.  \n\nThis service requires you to enter a personal OpenWeather API Key, which you can sign up for at this link: https://openweathermap.org/appid",
    "ja": "明日が晴れか雨かを調べて、それに応じたテキストを次のPieceに渡します。テキストは編集可能です。※このピースには、OpenWeatherのAPIキーが必要です。(openweathermap.org)"
  },
  "blockType": "service",
  "executor": "RBCCommonWebServiceExecutor",
  "serviceProxy": {
    "service": "SunOrRainy",
    "parameters": ["location_accurate"]
  },
  "permissionList": {
    "ios": ["location"],
    "android": ["location"]
  },
  "osType": "none",
  "categoryIds": ["cat_0002"],
  "output": {
    "type": "object",
    "properties": {
      "task": {
        "type": "string",
        "format": "text"
      }
    }
  },
  "preferences": {
    "type": "object",
    "properties": {
      "opernWeatherMapAPIKey": {
        "x-title": {
          "en": "OpenWeather API Key",
          "ja": "OpenWeatherのAPIキー"
        },
        "type": "string",
        "x-input-type": "text",
        "default": "APIkey",
        "x-description": {
          "en": "Input personal OpenWeather Map API key, which you can acquire at https://openweathermap.org/appid.",
          "ja": "OpenWeatherのAPIキーを入力してください。こちらから取得できます。https://openweathermap.org/appid"
        }
      },
      "taskIfSunny": {
        "x-input-type": "text",
        "type": "string",
        "x-title": {
          "en": "Sunny text",
          "ja": "晴れの日にすること"
        },
        "x-description": {
          "en": "Enter the text you want to send on to the next Piece when the outlook is sunny.",
          "ja": "晴れの日にすることを入力してください。"
        },
        "default": "明日は晴れです。"
      },
      "taskIfRainy": {
        "x-input-type": "text",
        "type": "string",
        "x-title": {
          "en": "Rainy Tex",
          "ja": "雨の日にすること"
        },
        "x-description": {
          "en": "Enter the text you want to send on to the next Piece when the outlook is rainy.",
          "ja": "雨の日にすることを入力してください。"
        },
        "default": "明日は雨です。"
      },
      "taskIfOther": {
        "x-input-type": "text",
        "type": "string",
        "x-title": {
                    "en": "Other text",
          "ja": "晴れでも雨でもない日にすること"
        },
          "x-description": {
                    "en": "Enter the text you want to send when the forecast is neither sunny nor rainy.",
          "ja": "晴れでも雨でもない日にすることを入力してください"
        },
        "default": "明日は晴れでも雨でもありません。"
      }
    }
  }
}
今回作成するPieceの要点となる、"serviceProxy", "permissionList", "preferences", "output"について解説します。
"serviceProxy": {
    "service": "SunOrRainy",
    "parameters": ["location_accurate"]
},
"permissionList": {
    "ios": ["location"],
    "android": ["location"]
}
位置情報を取得するために、"parameters"と"permissionList"を追加しました。
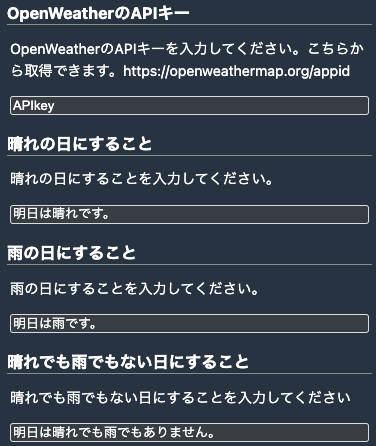
ユーザーが晴れの日、雨の日にすること、API Keyを入力できるようにしました。
"preferences": {
    "type": "object",
    "properties": {
        "opernWeatherMapAPIKey": {
            "x-title": {
                "en": "OpenWeather API Key",
                "ja": "OpenWeatherのAPIキー"
            },
            "type": "string",
            "x-input-type": "text",
            "default": "APIkey",
            "x-description": {
                "en": "Input personal OpenWeather Map API key, which you can acquire at https://openweathermap.org/appid.",
                "ja": "OpenWeatherのAPIキーを入力してください。こちらから取得できます。https://openweathermap.org/appid"
            }
        },
        "taskIfSunny": {
            "x-input-type": "text",
            "type": "string",
            "x-title": {
              "en": "Sunny text",
              "ja": "晴れの日にすること"
            },
            "x-description": {
              "en": "Enter the text you want to send on to the next Piece when the outlook is sunny.",
              "ja": "晴れの日にすることを入力してください。"
            },
            "default": "明日は晴れです。"
        },
        "taskIfRainy": {
            "x-input-type": "text",
            "type": "string",
            "x-title": {
                "en": "Rainy Tex",
                "ja": "雨の日にすること"
            },
            "x-description": {
                "en": "Enter the text you want to send on to the next Piece when the outlook is rainy.",
                "ja": "雨の日にすることを入力してください。"
            },
            "default": "明日は雨です。"
        },
        "taskIfOther": {
            "x-input-type": "text",
            "type": "string",
            "x-title": {
                "en": "Other text",
                "ja": "晴れでも雨でもない日にすること"
            },
            "x-description": {
                "en": "Enter the text you want to send when the forecast is neither sunny nor rainy.",
                "ja": "晴れでも雨でもない日にすることを入力してください"
            },
            "default": "明日は晴れでも雨でもありません。"
        }
    }
}
実際のアプリの画面では、以下のようなイメージです。
次のPieceに文字列を渡せるようにします。
"output": {
    "type": "object",
    "properties": {
        "task": {
            "type": "string",
            "format": "text"
        }
    }
}
文字列のみを渡せるように、"type"は"string","format"は"text"にしています。
"format"については、ドキュメントを参照ください。
次に Piece Funcを解説します。
// axiosの読み込み
const axios = require("axios");

exports.handler = async (event) => {
    if (event.call === 'lambda') {
        console.log('CALLED:LAMBDA');
        /* If you use the external modules, please code the following: - 外部モジュールを使う場合に記入してくだい。
            e.g.  if ( xxxx !== null ){} // xxxx: instance for the module.  -  xxxx : 生成したインスタンス */
        if (axios !== null) { }
        return;
    }

    // 位置情報
    const lat = event["properties"]["parameters"]["location"]["latitude"];
    const lon = event["properties"]["parameters"]["location"]["longitude"];

    // // API Key
    const apiKey = event["properties"]["preferences"]["opernWeatherMapAPIKey"];

    // One Call API
    const url = "https://api.openweathermap.org/data/2.5/onecall?units=metric&lang=ja&exclude=current,minutely,hourly";
    const openWeatherURL = `${url}&lat=${lat}&lon=${lon}&appid=${apiKey}`;

    // OpenWeather
    const doOpenWeather = async () => {
        try {
            const result = await axios.get(openWeatherURL);

            const tommorowData = result["data"]["daily"][0];
            return tommorowData["weather"][0]["main"];
        } catch (error) {
            console.log(`Error message: ${error.message}`);
            return "エラー";
        }
    };

    const weather = await doOpenWeather();

    // 天気に応じて、通知する内容
    const taskIfSunny = event["properties"]["preferences"]["taskIfSunny"];
    const taskIfRainy = event["properties"]["preferences"]["taskIfRainy"];
    const taskIfOther = event["properties"]["preferences"]["taskIfOther"];

    // 次のPieceに渡すデータ
    let response;

    if (weather == "Clear") {
        response = {
            status: 200,
            body: {
                task: taskIfSunny
            }
        };
    } else if (weather == "Rain") {
        response = {
            status: 200,
            body: {
                task: taskIfRainy
            }
        };
    } else if (weather == "エラー") {
        response = {
            status: 500,
            body: {
                task: '上手く動作しませんでした。'
            }
        };
    } else {
        response = {
            status: 200,
            body: {
                task: taskIfOther
            }
        };
    }
    return response;
};
大きく以下のことを実行しています。
位置情報は基礎編で解説した通り、次のように記載しています。
// 位置情報
const lat = event["properties"]["parameters"]["location"]["latitude"];
const lon = event["properties"]["parameters"]["location"]["longitude"];
天気情報の取得には、One Call APIを利用しています。翌日の情報を一度取得し、成功したらそのまま天気が何かを抜き出しています。
もし失敗した場合は、"エラー"を返すようにしています。
const doOpenWeather = async () => {
    try {
      const result = await axios.get(openWeatherURL);

      const tommorowData = result["data"]["daily"][0];
      return tommorowData["weather"][0]["main"];
    } catch (error) {
        console.log(`Error message: ${error.message}`);
        return "エラー";
    }
};
次のPieceに渡すデータは、if…else文を使って条件分岐を行っています。"エラー"の場合は、status: 500にしています。
if (weather == "Clear") {
    response = {
        status: 200,
        body: {
            task: taskIfSunny
        }
    };
} else if (weather == "Rain") {
    response = {
        status: 200,
        body: {
            task: taskIfRainy
        }
    };
} else if (weather == "エラー") {
    response = {
        status: 500,
        body: {
            task: '上手く動作しませんでした。'
        }
    };
} else {
    response = {
        status: 200,
        body: {
            task: taskIfOther
        }
    };
}
晴れ、雨、エラー、その他の天気の場合でそれぞれ条件を作成しました。
今回は晴耕雨読がテーマなので、晴れと雨に絞りましたが、曇りの時などで動作を変えてみるのも面白いと思います。
今回は新しく、位置情報と条件分岐を活用しました。他にも応用できると思うので、是非活用してPieceを作成してみてください。
ご覧くださいましてありがとうございました。