リアルタイムに目の位置推定
2020/06/02
「AI CORE XスターターキットとOpenVINO™ですぐに始めるディープラーニング推論」シリーズの8回目記事です。
このシリーズは、「ディープラーニングとは何か」から始まり、「各種ツールの使い方」「プログラミング基礎」「プログラミング応用・実践」までをステップバイステップでじっくり学び、自分で理解してオリジナルのAIアプリケーションが作れるようになることを目指しています。

第8回目はカメラ画像を入力としてリアルタイムに目の位置をディープラーニングで推定します。
目次
- リアルタイム顔検出
- 顔検出後にランドマーク回帰
- 簡易サングラス描画
リアルタイム顔検出
動画のようなイメージで、リアルタイムに顔検出を行います。
前回の顔検出の入力は静止画でしたが、これをカメラ映像に変更します。USBカメラを接続して、以下コードをコピペして実行してみて下さい
#==================================================# 準備#==================================================# importimport cv2import numpy as npfrom openvino.inference_engine import IENetwork, IEPlugin# ターゲットデバイスの指定plugin =# モデルの読み込みnet =exec_net = plugin# 入出力データのキー取得input_blob =out_blob =# カメラ準備cap = cv2#==================================================# メインループ#==================================================while True:# キー押下で終了key = cv2if key != -1:break# カメラ画像読み込みret, frame = cap# 入力データフォーマットへ変換img = cv2 # HeightとWidth変更img = img # HWC > CHWimg = np # CHW > BCHW# 推論実行out = exec_net# 出力から必要なデータのみ取り出しout =# 不要な次元を削減out = np# 検出されたすべての顔領域に対して1つずつ処理for detection in out:# conf値の取得confidence =# バウンディングボックス座標を入力画像のスケールに変換xmin =ymin =xmax =ymax =# conf値が0.5より大きい場合のみバウンディングボックス表示if confidence > 0.5:# バウンディングボックス表示cv2# 画像表示cv2#==================================================# 終了処理#==================================================capcv2
どうですしょうか?カメラを皆さんの顔やウェブ上にある適当な顔画像に向けたりすると、しっかりと顔検出されているかと思います。複数の顔も検出されます。
それではコードの説明です。
全体が分かりやすいように、コメント文を使って「準備」「メインループ」「終了処理」に分けました。前回からの変化点は下記の通りです。
- 準備にて「カメラ準備」追加
- メインループ部は全体を
while True:ブロック化 - メインループの最初に「キー押下で終了」と「カメラ画像読み込み」を追加
- 終了処理にて
cap.releaseを追加
追加項目は全てOpenCV基礎で学んだ内容です。
入力画像はカメラから常に異なる画像が入ってくるのでその都度処理が必要ですが、モデル読み込みは常に同じモデルを使うため、最初の1回だけで良いというのがポイントです。
プログラムを実行すると分かりますが、実は処理時間が長かったのはモデルの読み込みの部分です。推論自体は非常に速く処理されていることが実感できたかと思います。
顔検出後にランドマーク回帰
今度は、動画のようにリアルタイムにカメラ映像入力からランドマーク回帰まで一気に行いたいと思います。
#==================================================# 準備#==================================================# importimport cv2import numpy as npfrom openvino.inference_engine import IENetwork, IEPlugin# ターゲットデバイスの指定plugin =# モデルの読み込みと入出力データのキー取得(顔検出)net_face =exec_net_face = plugininput_blob_face =out_blob_face =# モデルの読み込みと入出力データのキー取得(landmarks)net_landmarks =exec_net_landmarks = plugininput_blob_landmarks =out_blob_landmarks =# カメラ準備cap = cv2#==================================================# メインループ#==================================================while True:# キー押下で終了key = cv2if key != -1:break# カメラ画像読み込みret, frame = cap# 入力データフォーマットへ変換img = cv2 # HeightとWidth変更img = img # HWC > CHWimg = np # CHW > BCHW# 推論実行out = exec_net_face# 出力から必要なデータのみ取り出しout =# 不要な次元を削減out = np# 検出されたすべての顔領域に対して1つずつ処理for detection in out:# conf値の取得confidence =# バウンディングボックス座標を入力画像のスケールに変換xmin =ymin =xmax =ymax =# conf値が0.5より大きい場合のみLandmarks推論とバウンディングボックス表示if confidence > 0.5:# 顔検出領域はカメラ範囲内に補正する。特にminは補正しないとエラーになるif xmin < 0:xmin = 0if ymin < 0:ymin = 0if xmax > frame.shape:xmax = frame.shapeif ymax > frame.shape:ymax = frame.shape#--------------------------------------------------# ディープラーニングLandmarks推定#--------------------------------------------------# 顔領域のみ切り出しimg_face =# 入力データフォーマットへ変換img = cv2 # HeightとWidth変更img = img # HWC > CHWimg = np # CHW > BCHW# 推論実行out = exec_net_landmarks# 出力から必要なデータのみ取り出しout =# 不要な次元を削減out = np# Landmarks検出位置にcircle表示for i in :x = + xminy = + ymincv2# バウンディングボックス表示cv2# 画像表示cv2#==================================================# 終了処理#==================================================capcv2
コードの解説です。
今回は1つのコードの中にモデルが2種類あるため、変数名に下記文字列を追加して顔検出とランドマーク回帰でそれぞれ分けています。Inference Engineに関わる箇所に適用しています。
_face_landmarks
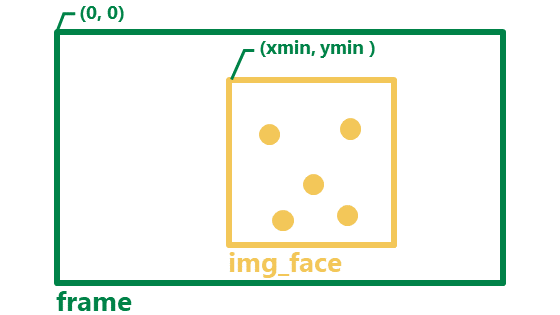
カメラ映像から得られた画像frameに対し顔検出を行い、スライスを使って顔のみの画像img_faceを作っています。さらにimg_faceに対してランドマーク回帰を行っているという流れです。
なお、顔領域を切り出した後にバウンディングボックス描画を行います。順番が逆になると切り出す顔の中にバウンディングボックスの線が混じってしまうためです。
また、スライスを使って顔を切り出す際に、カメラ画像の範囲外に座標があるとエラーになってしまうため、事前にカメラ範囲内になるように補正しています。
各ランドマーク位置に円を表示する際に注意する点があります。
正規化された座標から元の座標のスケールに戻す際は、画像全体のframe.shape ではなく 顔画部分のみのimg_face.shapeを使うことです。また、全体画像の座標系に位置を合わせるため、最後にそれぞれxmin、yminを加えていることもポイントです。
# Landmarks検出位置にcircle表示for i in :x = + xminy = + ymincv2
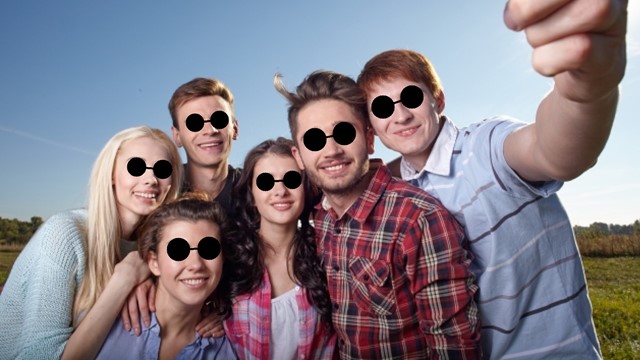
簡易サングラス描画
最後に少しオマケですが、リアルタイムに得られる目の座標情報を元にして簡易的なサングラスを描画してみたいと思います。イメージは動画の通りです。
#==================================================# 準備#==================================================# importimport cv2import numpy as npfrom openvino.inference_engine import IENetwork, IEPlugin# ターゲットデバイスの指定plugin =# モデルの読み込みと入出力データのキー取得(顔検出)net_face =exec_net_face = plugininput_blob_face =out_blob_face =# モデルの読み込みと入出力データのキー取得(landmarks)net_landmarks =exec_net_landmarks = plugininput_blob_landmarks =out_blob_landmarks =# カメラ準備cap = cv2#==================================================# メインループ#==================================================while True:# キー押下で終了key = cv2if key != -1:break# カメラ画像読み込みret, frame = cap# 入力データフォーマットへ変換img = cv2 # HeightとWidth変更img = img # HWC > CHWimg = np # CHW > BCHW# 推論実行out = exec_net_face# 出力から必要なデータのみ取り出しout =# 不要な次元を削減out = np# 検出されたすべての顔領域に対して1つずつ処理for detection in out:# conf値の取得confidence =# バウンディングボックス座標を入力画像のスケールに変換xmin =ymin =xmax =ymax =# conf値が0.5より大きい場合のみLandmarks推論とバウンディングボックス表示if confidence > 0.5:# 顔検出領域はカメラ範囲内に補正する。特にminは補正しないとエラーになるif xmin < 0:xmin = 0if ymin < 0:ymin = 0if xmax > frame.shape:xmax = frame.shapeif ymax > frame.shape:ymax = frame.shape#--------------------------------------------------# ディープラーニングLandmarks推定#--------------------------------------------------# 顔領域のみ切り出しimg_face =# 入力データフォーマットへ変換img = cv2 # HeightとWidth変更img = img # HWC > CHWimg = np # CHW > BCHW# 推論実行out = exec_net_landmarks# 出力から必要なデータのみ取り出しout =# 不要な次元を削減out = np# 目の座標を顔画像のスケールに変換し、オフセット考慮eye_left_x = + xmineye_left_y = + ymineye_right_x = + xmineye_right_y = + ymin# 目の位置に表示r =cv2cv2cv2# バウンディングボックス表示#cv2.rectangle(frame, (xmin, ymin), (xmax, ymax), color=(89, 199, 243), thickness=3)# 画像表示cv2#==================================================# 終了処理#==================================================capcv2
コードの変化点は以下の部分です
今回は、ランドマーク5個のうちの両目の位置座標だけを活用しています
# 目の座標を顔画像のスケールに変換し、オフセット考慮eye_left_x = + xmineye_left_y = + ymineye_right_x = + xmineye_right_y = + ymin# 目の位置に表示r =cv2cv2cv2# バウンディングボックス表示#cv2.rectangle(frame, (xmin, ymin), (xmax, ymax), color=(89, 199, 243), thickness=3)
内容は次の通りです
- それぞれの目の座標位置に半径
rの黒い円を描画 rは一定値ではなく、顔の大きさの1/6になるように設定- メガネのフレームをイメージして、目と目の間に線分を描画※
- バウンディングボックスは非表示
※メガネのフレーム(ブリッジ部)の太さは簡易的に3で一定とした
課題
図形だと少し違和感があるので、実際には画像を使うべきです。
今回は図形の円を使用したので、角度に関しては考慮する必要がありませんでした。また、画像を用いる場合は、角度や大きさだけでなく、どの位置に表示させるのかをしっかり決める必要がありそうです。

実際の課題解決は10回目の「バーチャル試着アプリ」で取り上げます。
余力があれば、次回に進む前にメガネ画像や帽子画像表示にチャレンジしてみるのも良いかと思います。画像はこちらのページなどから入手可能です。
次回は、バーチャル試着アプリ時に必要となるオリジナルツールの作成を行います。
以上、「リアルタイムに目の位置推定」でした。