2019/08/05
リアルタイム顔検出

どうも、ディープなクラゲです。
「OpenVINO™ でゼロから学ぶディープラーニング推論」シリーズの8回目記事です。
このシリーズは、ディープラーニング概要、OpenVINO™ツールキット、Neural Compute Stick、RaspberryPiの使い方、Pythonプログラミングをゼロから徹底的に学び、成果としてディープラーニング推論アプリケーションが理解して作れるようになることを目指します。
第8回目は前回の応用で、ディープラーニング顔検出に挑戦します。最終的にカメラを使ってリアルタイムに推論を行います。
【 目次 】
- 静止画像で顔検出
- カメラ映像でリアルタイム顔検出
静止画像で顔検出
いきなりカメラ映像で顔検出する前に、まずは静止画像で行いたいと思います。
顔検出についても、前回同様に学習済みモデルが存在しますので、それを活用します。
学習済みモデルの取得
インテルの学習済みモデルを使用します。
modelとweightをこちらのサイトからダウンロードしてください。workspaceの中のFP16フォルダに移動してください。
入力データ
学習済みモデルが要求する入力フォーマットをこちらのページから確認します。
Inputs
name: "input" , shape: [1x3x300x300] - An input image in the format [BxCxHxW], where:B - batch size
C - number of channels
H - image height
W - image width
Expected color order - BGR.
入力データの名前に 'input' とありますが、今回も 'data' が正解です
型は [1x3x300x300]、画像 フォーマットは[BxCxHxW]で、カラーの順番は BGR です。
前回の感情分類との違いは、高さ×幅の画像サイズだけです。B - batch sizeという項目がありますが、前回と同じ大きさ1なので気にしなくて大丈夫です。ちなみに気になる人に教えるとbatch sizeは画像の枚数に相当します。
具体的なコードは以下の通りです。前回から(64, 64)が(300, 300)に変わっただけです。
# 画像サイズを300x300にするimg = cv2# HWCからCHWに変更img = img# 大きさ1の次元を追加し4次元にする。省略OKimg = np
画像データの準備です。最低300x300ピクセル以上のサイズがあった方が良いです。
人の顔が写っていれば何でもOKです。前回同様クラゲは以下のサイトからSサイズでダウンロードしました。なるべく正面の顔が写っている画像を選んでください。
https://www.pakutaso.com/20190610177post-21595.html

ファイル名はphoto.jpgに変更し、workspaceフォルダに移動しました
とりあえず推論して出力
出力フォーマットの確認の前に、推論させて出力してみます
import cv2import numpy as np# モジュール読み込みimport syssys.pathfrom openvino.inference_engine import IENetwork, IEPlugin# ターゲットデバイスの指定plugin =# モデルの読み込みnet =exec_net = plugin# 入力画像読み込みimg_face = cv2# 入力データフォーマットへ変換img = cv2 # サイズ変更img = img # HWC > CHWimg = np # 次元合せ# 推論実行out = exec_net# 出力print(out)
以下のような出力結果が出たと思います。
ここでまず分かるのは出力データ名は'detection_out'であるということです。
出力データ
再び先程のモデル説明ページに戻って出力フォーマットを見てゆきましょう
Outputs
The net outputs a blob with shape: [1, 1, N, 7], where N is the number of detected bounding boxes. For each detection, the description has the format: [image_id, label, conf, x_min, y_min, x_max, y_max], where:
- image_id - ID of the image in the batch
- label - predicted class ID
- conf - confidence for the predicted class
- (x_min, y_min) - coordinates of the top left bounding box corner
- (x_max, y_max) - coordinates of the bottom right bounding box corner.
型は[1, 1, N, 7]で、Nは検出したバウンディングボックスの数と書いてあります。バウンディングボックスとは顔検出した際に顔に描かれる四角い枠のことです。
最後の次元の7個の要素に対する詳細フォーマットは[image_id, label, conf, x_min, y_min, x_max, y_max]で、それぞれの説明が個別に書いてあります。
- image_id - batchのID番号(今回バッチサイズは1なので無視)
- label - 予測クラスID(今回検出するのは顔のみなので無視)
- conf - 予測の信用度
- (x_min, y_min) - バウンディングボックスの左上座標
- (x_max, y_max) - バウンディングボックスの右下座標
前回の感情分類は「分類」なので、入力画像全体に対して5つの感情に対する割合を出力するものでした。一方で今回の顔検出は「物体検出」なので、入力画像全体に対して、顔っぽい領域すべてを列挙します。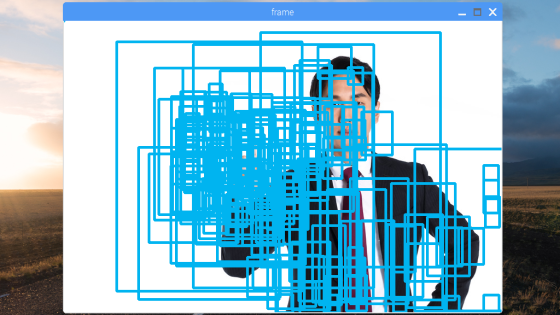
バウンディングボックスを表示する際は、見つけた所全てを表示するのではなく、confをチェックしてある程度信用度の高い領域のみを表示させます。
では、実際のコードをみてゆきましょう。
まず、データの取り出しですが、前回同様に必要な部分のみを抽出します。
# 出力から必要なデータのみ取り出しout =out = np #不要な次元の削減
outには顔っぽい領域を検出したデータ配列が複数含まれています。forを使って1つずつ変数detectionに配列を取り出します。detectionの中には7つの要素がありますが、このうち必要な5つだけを取り扱います。
# 検出されたすべての顔領域に対して1つずつ処理for detection in out:# conf値の取得confidence =# バウンディングボックス座標を入力画像のスケールに変換xmin =ymin =xmax =ymax =# conf値が0.5より大きい場合のみバウンディングボックス表示if confidence > 0.5:cv2
detection[2]にconf値データが入っていますが、floatを使って小数に型変換しています。detection[3]~detection[6]にはバウンディングボックスの座標が入っていますが、0.0~1.0の正規化された値が入っています。そこで、入力画像の幅と高さを最大とする座標値に変換します。
「NumPyを学ぶ」で習ったようにframe.shape[0]には画像の高さ、frame.shpe[1]には画像の幅が入っていますので、それを活用しています。さらにintで整数値へ型変換しています。
最後にifでconf値をみて0.5を超えている場合のみバウンディングボックスを描画しています。
全体プログラム
実行できる全体のプログラムです。
同じディレクトリにFP16フォルダとphoto.jpgがあることを確認してください。
import cv2import numpy as np# モジュール読み込みimport syssys.pathfrom openvino.inference_engine import IENetwork, IEPlugin# ターゲットデバイスの指定plugin =# モデルの読み込みnet =exec_net = plugin# 入力画像読み込みframe = cv2# 入力データフォーマットへ変換img = cv2 # サイズ変更img = img # HWC > CHWimg = np # 次元合せ# 推論実行out = exec_net# 出力から必要なデータのみ取り出しout =out = np #サイズ1の次元を全て削除# 検出されたすべての顔領域に対して1つずつ処理for detection in out:# conf値の取得confidence =# バウンディングボックス座標を入力画像のスケールに変換xmin =ymin =xmax =ymax =# conf値が0.5より大きい場合のみバウンディングボックス表示if confidence > 0.5:cv2# 画像表示cv2# キーが押されたら終了cv2cv2
このような表示結果になったと思います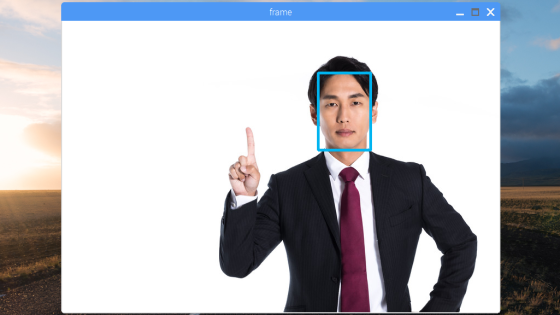
複数の顔がある場合でもバッチリです。色々な画像を入力してみてください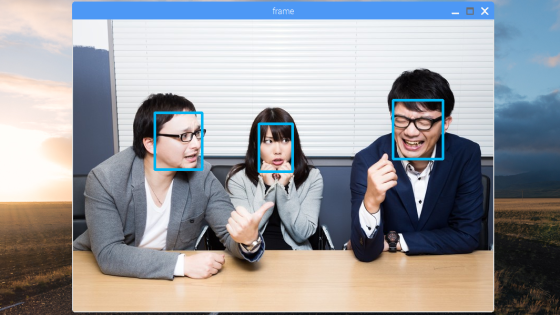
カメラ映像でリアルタイム顔検出
今度はカメラ映像入力に変更したいと思います。
基本的に「OpenCVを学ぶ」で習った「カメラ映像の読み込みと表示」を組み合わせるだけです
import cv2import numpy as np# モジュール読み込みimport syssys.pathfrom openvino.inference_engine import IENetwork, IEPlugin# ターゲットデバイスの指定plugin =# モデルの読み込みnet =exec_net = plugin# カメラ準備cap = cv2# メインループwhile True:ret, frame = cap# Reload on errorif ret == False:continue# 入力データフォーマットへ変換img = cv2 # サイズ変更img = img # HWC > CHWimg = np # 次元合せ# 推論実行out = exec_net# 出力から必要なデータのみ取り出しout =out = np #サイズ1の次元を全て削除# 検出されたすべての顔領域に対して1つずつ処理for detection in out:# conf値の取得confidence =# バウンディングボックス座標を入力画像のスケールに変換xmin =ymin =xmax =ymax =# conf値が0.5より大きい場合のみバウンディングボックス表示if confidence > 0.5:cv2# 画像表示cv2# 何らかのキーが押されたら終了key = cv2if key != -1:break# 終了処理capcv2
画像入力の代わりにカメラ準備を行い、whileループでフレーム取得・ディープラーニング推論・画像表示を繰り返し、何かキーが押されたらループを抜けるようにしています。
クラゲはタブレットにwebカメラを向けてリアルタイム顔認識させてみました。
皆さんの顔はもちろん、スマホやPCに顔画像を表示した状態にカメラを向けてもしっかり検出しますので、色々と試してみて下さい!
さあ、これで自動的に顔領域を検出することが出来ました。次回は顔検出+感情分類そして、グラフィック描画を行います!
以上、「リアルタイム顔検出」でした。