2019/08/09
リアルタイム感情分析アプリ

どうも、ディープなクラゲです。
「OpenVINO™ でゼロから学ぶディープラーニング推論」シリーズの9回目記事です。
このシリーズは、ディープラーニング概要、OpenVINO™ツールキット、Neural Compute Stick、RaspberryPiの使い方、Pythonプログラミングをゼロから徹底的に学び、成果としてディープラーニング推論アプリケーションが理解して作れるようになることを目指します。
第9回目は「顔検出」と「感情分類」を組合せ、リアルタイムにグラフ表示や画像表示を行うアプリケーションを完成させます。
【 目次 】
- 顔検出 + 感情分類
- 棒グラフの表示
- 画像オーバーレイ
顔検出 + 感情分類
前回のリアルタイム顔検出に、感情分類のコードを加えることで出来ます。
先に実行できる全体コードを示します。
import cv2import numpy as np# モジュール読み込みimport syssys.pathfrom openvino.inference_engine import IENetwork, IEPlugin# ターゲットデバイスの指定plugin =# モデルの読み込み(顔検出)net =exec_net = plugin# モデルの読み込み(感情分類)net_emotion =exec_net_emotion = plugin# カメラ準備cap = cv2# メインループwhile True:ret, frame = cap# Reload on errorif ret == False:continue# 入力データフォーマットへ変換img = cv2 # サイズ変更img = img # HWC > CHWimg = np # 次元合せ# 推論実行out = exec_net# 出力から必要なデータのみ取り出しout =out = np #サイズ1の次元を全て削除# 検出されたすべての顔領域に対して1つずつ処理for detection in out:# conf値の取得confidence =# バウンディングボックス座標を入力画像のスケールに変換xmin =ymin =xmax =ymax =# conf値が0.5より大きい場合のみ感情推論とバウンディングボックス表示if confidence > 0.5:# 顔検出領域はカメラ範囲内に補正する。特にminは補正しないとエラーになるif xmin < 0:xmin = 0if ymin < 0:ymin = 0if xmax > frame.shape:xmax = frame.shapeif ymax > frame.shape:ymax = frame.shape# 顔領域のみ切り出しframe_face =# 入力データフォーマットへ変換img = cv2 # サイズ変更img = img # HWC > CHWimg = np # 次元合せ# 推論実行out = exec_net_emotion# 出力から必要なデータのみ取り出しout =out = np #不要な次元の削減# 出力値が最大のインデックスを得るindex_max = np# 各感情の文字列をリスト化list_emotion =# 文字列描画cv2# バウンディングボックス表示cv2# 1つの顔で終了break# 画像表示cv2# 何らかのキーが押されたら終了key = cv2if key != -1:break# 終了処理capcv2
実行の静止画です。※実際はリアルタイムカメラ映像です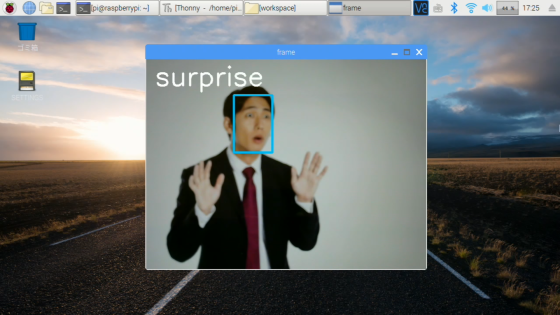
いくつかポイントがあります。
モデル読み込みの追加
顔検出ではnet, exec_netという変数を用いていますので、感情分類ではnet_emotion, exec_net_emotionという名前にしています。
# モデルの読み込み(感情分類)net_emotion =exec_net_emotion = plugin
顔領域の切り出し
これは「NumPyを学ぶ」で習った「スライス」を活用することで簡単にできます
# 顔領域のみ切り出しframe_face =
ただし、顔検出はカメラの枠から顔がはみ出た場合に、負の値になることがあり、cv2.resize時にエラーになってしまいます。そこで、顔領域切り出し前に、顔検出領域をカメラ範囲内に補正しています
# 顔検出領域はカメラ範囲内に補正する。特にminは補正しないとエラーになるif xmin < 0:xmin = 0if ymin < 0:ymin = 0if xmax > frame.shape:xmax = frame.shapeif ymax > frame.shape:ymax = frame.shape
感情推論結果の表示
感情の文字列は、顔検出領域frame_faceではなく、カメラフレームframaeに対して描きます
文字の大きさや位置などは少し変えています。
# 文字列描画cv2
また、処理を軽くするために、感情推論は1フレーム辺り1つの顔のみとします
# 1つの顔で終了break
棒グラフの表示
これまではインデックスが最大の感情のみを表示していましたが、その他の感情の値も棒グラフを使って見える化したいと思います。
先に実行できる全体コードを示します。
import cv2import numpy as np# モジュール読み込みimport syssys.pathfrom openvino.inference_engine import IENetwork, IEPlugin# ターゲットデバイスの指定plugin =# モデルの読み込み(顔検出)net =exec_net = plugin# モデルの読み込み(感情分類)net_emotion =exec_net_emotion = plugin# カメラ準備cap = cv2# メインループwhile True:ret, frame = cap# Reload on errorif ret == False:continue# 入力データフォーマットへ変換img = cv2 # サイズ変更img = img # HWC > CHWimg = np # 次元合せ# 推論実行out = exec_net# 出力から必要なデータのみ取り出しout =out = np #サイズ1の次元を全て削除# 検出されたすべての顔領域に対して1つずつ処理for detection in out:# conf値の取得confidence =# バウンディングボックス座標を入力画像のスケールに変換xmin =ymin =xmax =ymax =# conf値が0.5より大きい場合のみ感情推論とバウンディングボックス表示if confidence > 0.5:# 顔検出領域はカメラ範囲内に補正する。特にminは補正しないとエラーになるif xmin < 0:xmin = 0if ymin < 0:ymin = 0if xmax > frame.shape:xmax = frame.shapeif ymax > frame.shape:ymax = frame.shape# 顔領域のみ切り出しframe_face =# 入力データフォーマットへ変換img = cv2 # サイズ変更img = img # HWC > CHWimg = np # 次元合せ# 推論実行out = exec_net_emotion# 出力から必要なデータのみ取り出しout =out = np #不要な次元の削減# 出力値が最大のインデックスを得るindex_max = np# 各感情の文字列をリスト化list_emotion =# 文字列描画cv2# バウンディングボックス表示cv2# 棒グラフ表示str_emotion =text_x = 10text_y = frame.shape - 180rect_x = 80rect_y = frame.shape - 200for i in :cv2cv2text_y = text_y + 40rect_y = rect_y + 40# 1つの顔で終了break# 画像表示cv2# 何らかのキーが押されたら終了key = cv2if key != -1:break# 終了処理capcv2
実行の静止画です。※実際はリアルタイムカメラ映像です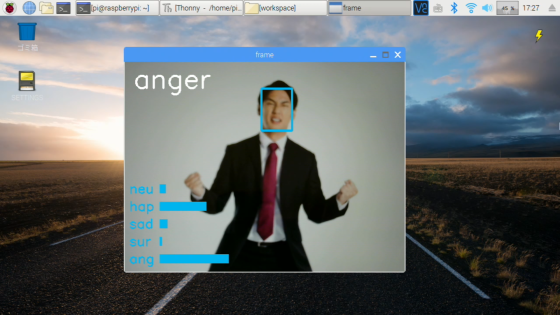
解説ですが、先程のコードに以下の部分を追加しただけです。
ポイントは、テキスト位置や長方形の位置を for ... in range( )を活用して繰り返し表示している点です。最後に40を加えることにより、Y軸方向に40ピクセルの間隔でテキストと棒グラフが並ぶことになります。
# 棒グラフ表示str_emotion =text_x = 10text_y = frame.shape - 180rect_x = 80rect_y = frame.shape - 200for i in :cv2cv2text_y = text_y + 40rect_y = rect_y + 40
out[i]にはそれぞれの感情推論の値が0~1.0の数値で入っているので、適当に300を掛けて長方形の横幅として使うことで、リアルタイムな棒グラフが表現できています。
画像オーバーレイ
最後の仕上げとして、インデックスが最大である感情をテキスト表示からPNG顔アイコン画像に変えます。
画像の準備
5つの感情それぞれに対し、次のような顔アイコンを割り当てています。


クラゲは こちらのページから顔アイコン画像をダウンロードし、トリミングとサイズ変更(200×200ピクセルに縮小)を行いました。皆さんは他のお好きな画像を使ってもらってOKです。workspaceフォルダにimageを作成し、その中に各画像を入れて下さい
クラスの準備
OpenCVには画像に画像を重ねるオーバーレイ関数がありません。そこで、クラスを活用することとしましょう。
「OpenCVで透過PNGファイルの重ね合わせ」を行うクラス
右上のDownload ZIPボタンを押します。ダウンロードフォルダに保存されているので、右クリックからファイルを展開します。pngoverlay.pyをworkspaceフォルダへ移動します
全体コード
先に実行できる全体コードを示します。
import cv2import numpy as np# モジュール読み込みimport syssys.pathfrom openvino.inference_engine import IENetwork, IEPlugin# pngoverlayクラス読み込みfrom pngoverlay import PNGOverlay# インスタンス生成icon_neutral =icon_happy =icon_sad =icon_surprise =icon_anger =# インスタンス変数をリストにまとめるicon_emotion =# ターゲットデバイスの指定plugin =# モデルの読み込み(顔検出)net =exec_net = plugin# モデルの読み込み(感情分類)net_emotion =exec_net_emotion = plugin# カメラ準備cap = cv2# メインループwhile True:ret, frame = cap# Reload on errorif ret == False:continue# 入力データフォーマットへ変換img = cv2 # サイズ変更img = img # HWC > CHWimg = np # 次元合せ# 推論実行out = exec_net# 出力から必要なデータのみ取り出しout =out = np #サイズ1の次元を全て削除# 検出されたすべての顔領域に対して1つずつ処理for detection in out:# conf値の取得confidence =# バウンディングボックス座標を入力画像のスケールに変換xmin =ymin =xmax =ymax =# conf値が0.5より大きい場合のみ感情推論とバウンディングボックス表示if confidence > 0.5:# 顔検出領域はカメラ範囲内に補正する。特にminは補正しないとエラーになるif xmin < 0:xmin = 0if ymin < 0:ymin = 0if xmax > frame.shape:xmax = frame.shapeif ymax > frame.shape:ymax = frame.shape# 顔領域のみ切り出しframe_face =# 入力データフォーマットへ変換img = cv2 # サイズ変更img = img # HWC > CHWimg = np # 次元合せ# 推論実行out = exec_net_emotion# 出力から必要なデータのみ取り出しout =out = np #不要な次元の削減# 出力値が最大のインデックスを得るindex_max = np# 各感情の文字列をリスト化list_emotion =# 文字列描画#cv2.putText(frame, list_emotion[index_max], (20, 60), cv2.FONT_HERSHEY_SIMPLEX, 2, (255, 255, 255), 4)# バウンディングボックス表示cv2# 棒グラフ表示str_emotion =text_x = 10text_y = frame.shape - 180rect_x = 80rect_y = frame.shape - 200for i in :cv2cv2text_y = text_y + 40rect_y = rect_y + 40# 顔アイコン表示# 1つの顔で終了break# 画像表示cv2# 何らかのキーが押されたら終了key = cv2if key != -1:break# 終了処理capcv2
追加したのは以下の3箇所です
モジュール読み込みの後に pngoverlay クラスの読み込みを行い、5つの画像それぞれに対しインスタンスを生成しています。
また、プログラムで扱いやすいように5つのインスタンスをリストにまとめています
# pngoverlayクラス読み込みfrom pngoverlay import PNGOverlay# インスタンス生成icon_neutral =icon_happy =icon_sad =icon_surprise =icon_anger =# インスタンス変数をリストにまとめるicon_emotion =
左上に表示していた文字列をコメントアウトして非表示にしました。
# 文字列描画#cv2.putText(frame, list_emotion[index_max], (20, 60), cv2.FONT_HERSHEY_SIMPLEX, 2, (255, 255, 255), 4)
forループの最後のbrakeの前に追加しています。
感情分類が最大のインデックスであるインスタンスに対しshowメソッド呼び出しを行い、顔アイコン画像を表示しています。
# 顔アイコン表示
以上、「リアルタイム感情分析アプリ」でした。
これで学習済みモデルを利用してPython APIでディープラーニング推論を実施し、実践的な表示まで行うことが身に付いたと思います。今回は「感情分類」と「顔検出」を使いましたが、インテルの学習済みモデルは他にもたくさんあります。
例えば、「歩行者の検出」「車の検出」「目・鼻・口の位置推定」「頭の方向推定」「性別・年齢の推定」などは、今までの応用ですぐにできてやりやすいと思います。
色々と挑戦してみて下さい!ではまた、お会いしましょう。お疲れさまでした!!